Back yard chickens are phenomenal – feed them waste from their kitchen and they in turn feed you fresh eggs daily. But when you catch the “chicken bug” in a big way, you’ll end up with so many eggs that just washing them turns into an hour long chore.
A bucket based egg washer is ideal for someone who washes several dozen at a time. The egg washer we built for this article will fit 70 of the golden-centered orbs at a time.
The basic premise is simple – air is blown through holes in a submerged pipe resting at the bottom of a standard bucket. The air flows upward through the bucket in the form of bubbles, which agitate the dirt off the eggs.
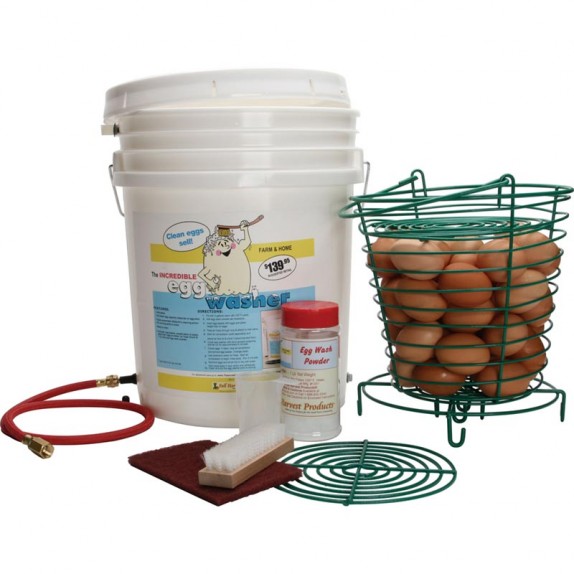 The commercial version of this egg washer pictured above sells for a burly $135 on Amazon. The DIY version we built below cost us about 30$ in parts.
How the Washer Works
Air is pumped at 15psi from the compressor, through the hose, into the nozzle, down the neck, and into the base. Holes in the base allow air to escape up through the water, which holds submerged dirty eggs in a wire basket. The one we made cleans 95% of eggs within 5 minutes. Following is footage of our egg washer during one of its first tests.
Parts List
- 5 gallon bucket (you should have lots already!)
- wire basket (must fit inside bucket with room for a 3/4 PVC pipe to spare)
- air hose quick connect. This is the most common type, and has the 1/4″ thread compatible with the following bushing:
- bushing adapter from air hose quick connect to 1/2″ PVC. This is the hardest part to find, here’s a link to the right one.
- 1/2″ to 3/4″ PVC elbow – threaded on the 1/2″ end
- 3/4″ PVC T joints x3
- 3/4″ PVC elbows x4
- 3/4″ PVC piping. We bought 1 length of 10′ but you only need about 5 feet. Use scraps if you got ’em.

Optional Parts
- 3/4″ PVC ball valve or a pressure regulator
- PVC glue
Required Tools:
- Drill
- Hacksaw or Chop Saw for cutting PVC
- Air Compressor to make bubbles
Assembly
First we’ll create the base piece. This part sits in the bucket’s bottom, immersed in water. Tiny 1/8″ holes throughout this piece bubble compressed air through the eggs, which wash all the grime off. This piece is made using three T-braces, four 3/4″ elbow joints and a couple feet of 3/4″ PVC pipe. 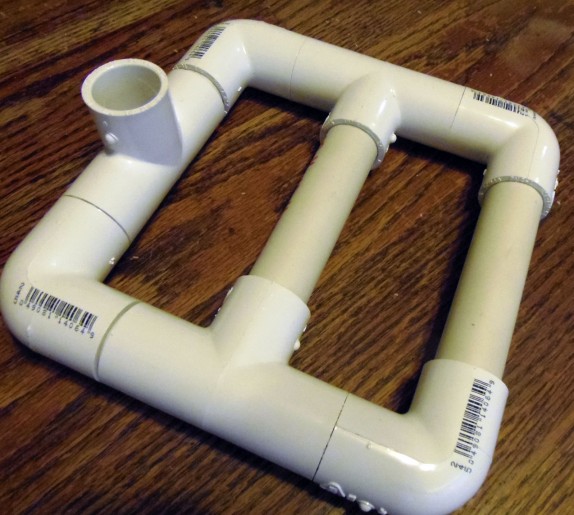 Every T and angle joint holds together with small lengths of PVC. We used two 5-1/2″ lengths to run lengthwise, and six 2″ lengths to hold the sides and back together. This is the exploded diagram of this part.
  You could glue these pieces of PVC together, but they hold together fine without it, since it will only need to hold up against 30 psi at maximum. Once your base piece is together, use a 1/8″ drill bit to make an even distribution of holes through the pipes and joint pieces. I drilled 1 hole on the bottom so water has a place to drain at the end of a washing.
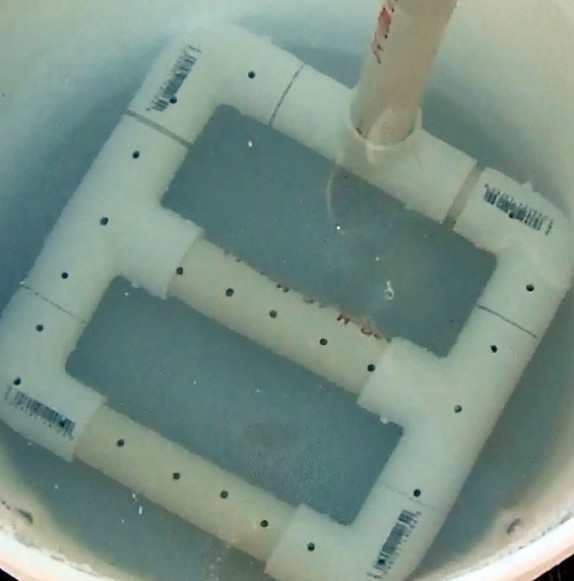
Compressor to Pipe
This is the most complex part of this design. Air must flow from your compressor into your bucket without losing any air to gaps or bad fittings. We used an air hose quick connect, and a 1/4″F to 1/2″M bushing to convert air hose thread into 1/2″ PVC thread (see parts list for links). Finally, we to 3/4 PVC with a 1/2″ threaded to 3/4″ non-threaded angle joint. 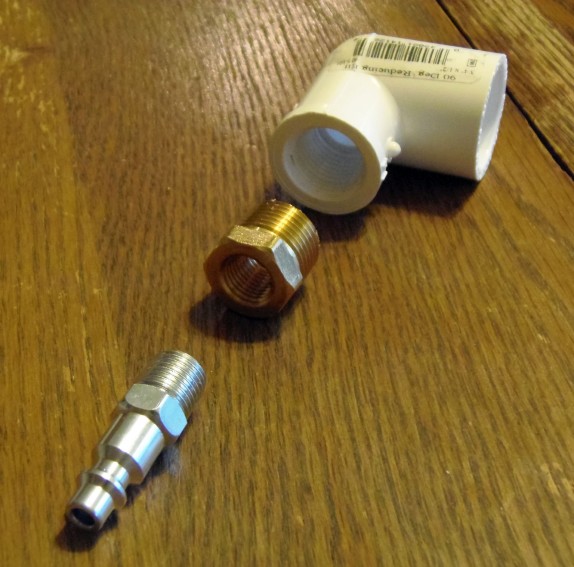
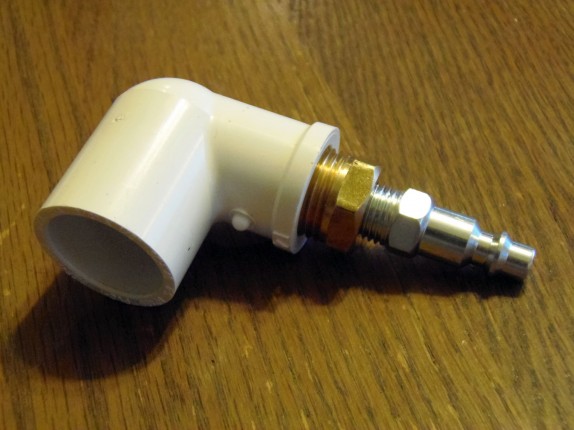 You could use plumber’s tape to ensure an absolutely airtight fit, but we found just screwing them in to be good enough for the psi we are working with.
A Stem to Hold it All Together
Connecting the two above pieces is a simple length of 3/4″ PVC. You can make your stem as long or as short as you find convenient, but it has to be long enough to poke out of your bucket. I made mine comically long to start with because it can always be cut down shorter. 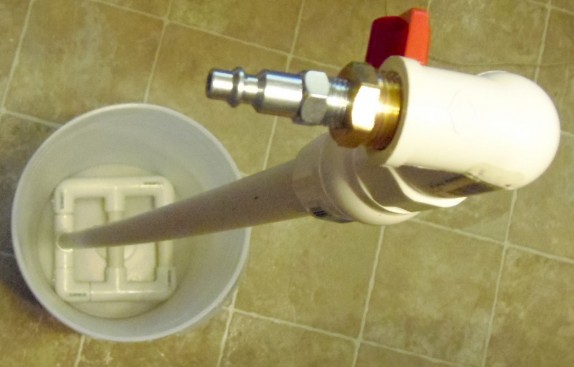
Choosing a Basket
We use a strong wire basket so the eggs don’t get crushed – by my estimate it’s around 2.5 gallons and will hold and clean 70-80 eggs at once. Just be sure to leave enough room for your 3/4″ PVC pipe stem.
Extra Considerations
- We use a tiny bit of detergent, between 1 and 2 teaspoons which will last through a couple batches without problem.
- Originally we used a ball valve, but it turned out to be redundant because our compressor already had an attached regulator which we kept between 15 and 30 psi.
![O]()

- A timer set for 5 minutes signals the end of the wash cycle and the beginning of the rinse cycle.
- To rinse, just spray the eggs through the basket with a strong blast of water to get the last of the grime off.
From Chicken to Carton as Fast as Possible
We’ve established a great workflow that minimizes egg handling. The secret is to only move the eggs twice – once into the basket, and once out of the basket into cartons.
- Eggs are scooped from under their mother hens, right into the wire baskets we clean in.
- We run the eggs through the washer sooner rather than later, so that grime has less of a chance to dry hard onto the eggs.
- Eggs are rinsed off well on top, sides and bottom and left to dry in the same basket.
- Once dry, all eggs are placed delicately into cartons.
Sources:
- Incredible Egg Washer – commercial version (sold on Amazon)
The post Chicken Egg Washer appeared first on Five Gallon Ideas.


